
How to Add, Edit, and Disable Users
Account Owners and Billing Managers can add new users, disable users, update user roles, and manage product licenses from the Users settings.
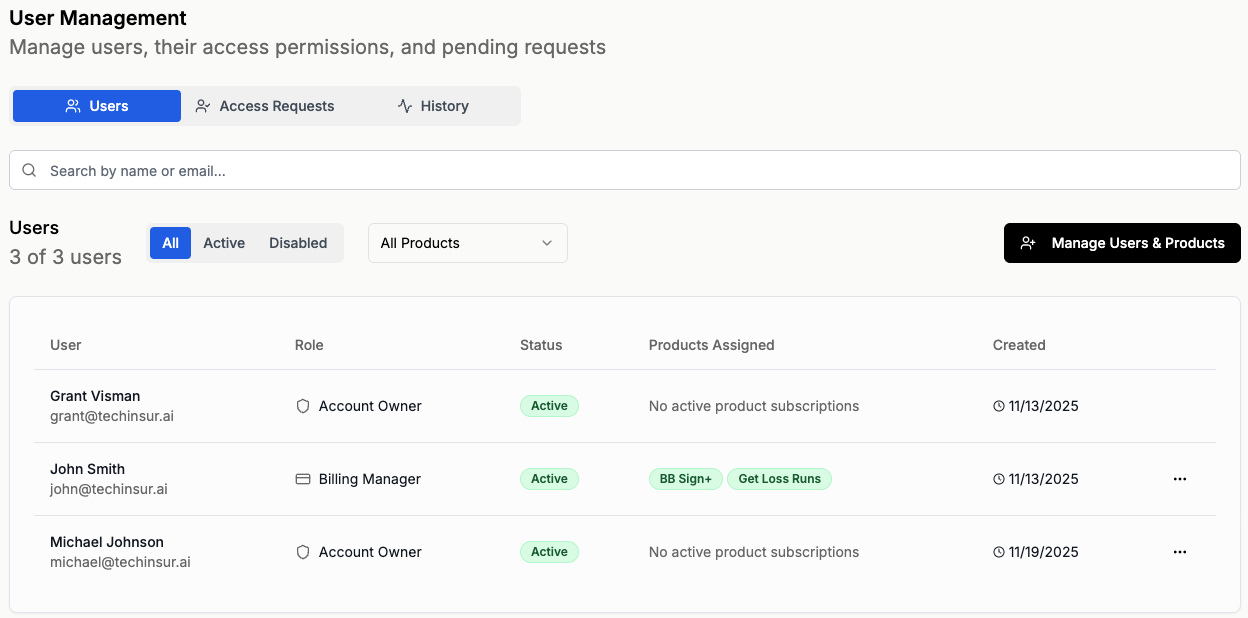
Each user in Broker Buddha AI has:
- One role (which determines what they can manage)
- Assigned products (which determine what they can access)
This guide explains how roles work and how to add or update users.
🔐 Understanding User Roles
User roles determine what someone can control within your organization.
Below is a comparison of available roles:
🔎 User Role Comparison
| Permission / Capability | 👤 User | 💳 Billing Manager | 👑 Account Owner |
|---|---|---|---|
| Access assigned products | ✅ | ✅ | ✅ |
| Create new users | ❌ | ✅ | ✅ |
| Change user roles | ❌ | ✅ | ✅ |
| Assign or remove product licenses | ❌ | ✅ | ✅ |
| Manage billing & subscriptions | ❌ | ✅ | ✅ |
| Update credit card on file | ❌ | ✅ | ✅ |
| Full organization access | ❌ | ❌ | ✅ |
👤 User
Standard access to assigned products.
Cannot manage billing, users, or product licenses.
💳 Billing Manager
Can:
- Manage billing and subscriptions
- Add or update the credit card on file
- Create new users
- Assign or remove product licenses
- Change users between User and Billing Manager
👑 Account Owner
Full administrative access.
Can perform all Billing Manager actions plus organization-wide controls.
💡 Best practice: Limit Account Owner access to trusted individuals only.
➕ Adding a New User
Step 1: Open User Settings
- Click the Settings ⚙️ icon in the bottom-left corner
- You will automatically land on the Users tab
- Click Manage Users & Products

Step 2: Start a New User Invitation
-
Click + Add New User
Complete the required fields:
- First Name
- Last Name
- Role
- (Optional) Add a Welcome Message

Step 3: Assign Product Access (Licenses)
Select which products this user should have access to.
You can:
- Choose specific products
- Or select all available products
Each product assigned provides a license for that user.

Step 4: Apply Changes
- Click Apply Changes
- Click Finish
The user will receive an invitation email to create their account.
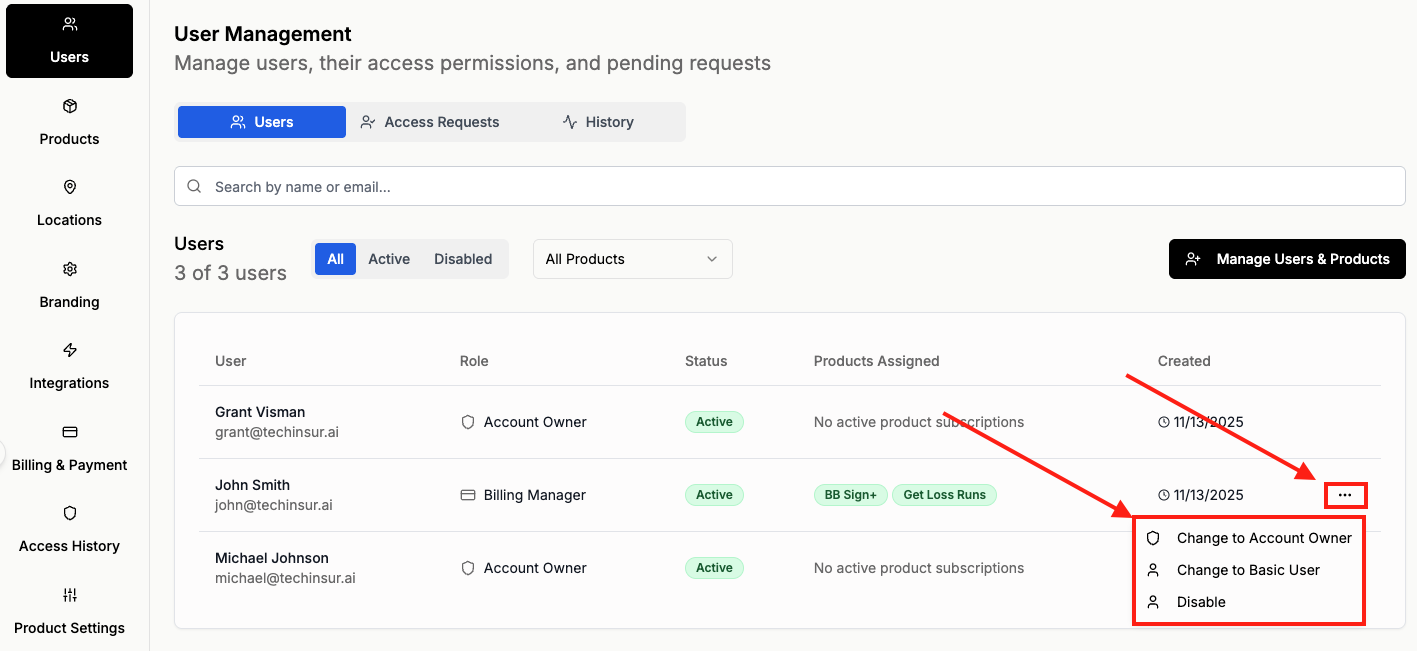
✏️ Updating an Existing User
Account Owners and Billing Managers can update a user’s role or product access at any time.
Changing a User’s Role
- Go to Settings → Users
-
Locate the user
Click the three-dot (⋯) menu next to their name
Select the new role:
- User
- Billing Manager
- Account Owner
Role changes take effect immediately.

Changing Product Access (Licenses)
- Click Manage Users & Products
- Search for the user (type at least 2 characters)
- Click Next
- Add or remove products
- Click Apply Changes
- Click Finish
Product license updates take effect immediately.

🧭 How to Disable a User
Step 1: Open User Settings
- Click the Settings ⚙️ icon in the bottom-left corner
- You will automatically land on the Users tab
Step 2: Select Disable
- Locate the user you want to disable
- Click the three-dot (⋯) menu next to their name
- Select Disable
Step 3: Review Subscription Impact (First Confirmation Screen)
When disabling a user, you may see a notice such as:
⚠️ Subscription Cancellation with Run-off Period
If this user holds the last active seat for one or more products:
- The seat will be removed from all products
- Access will continue until the end of the current billing period
- Licenses will be canceled after the billing period ends
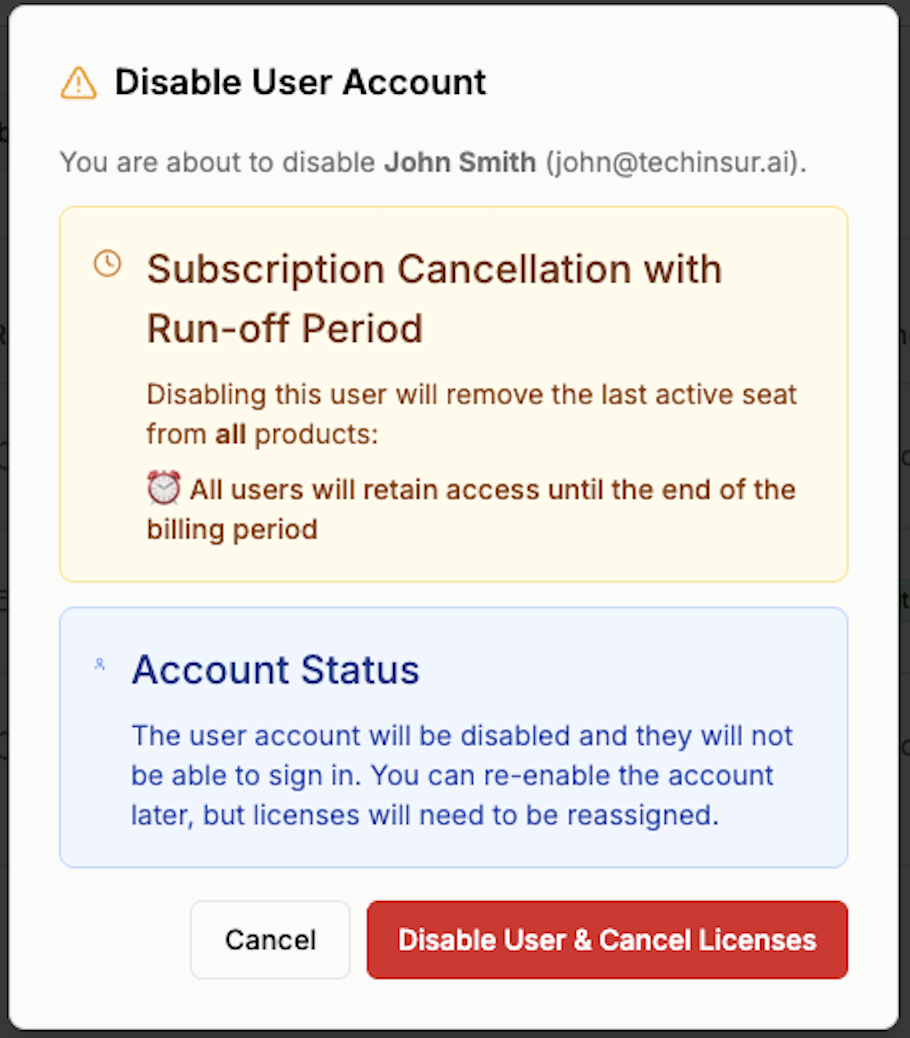
Carefully review the impact before proceeding.
Click Disable User & Cancel Licenses to continue.
Step 4: Confirm Account Status (Final Confirmation)
You will then see a confirmation explaining:
- The user account will be disabled
- They will no longer be able to sign in
- The account can be re-enabled later
- Licenses will need to be reassigned if access is restored
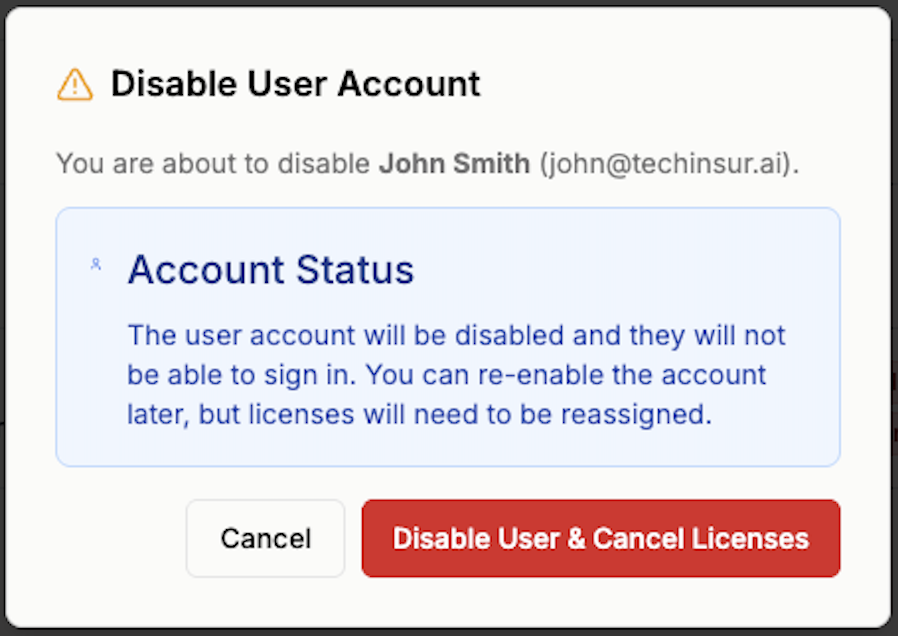
Click Disable User & Cancel Licenses to complete the process.
💳 What Happens to Product Licenses?
If the user held the last active seat:
- The seat is removed
- Billing adjustments occur at the end of the current billing cycle
- Access continues through the run-off period
If other users still hold seats:
- Only this user’s access is revoked
- Other users remain unaffected
🔐 What Happens After Disabling?
For the User
- They can no longer sign in
- They are notified about their account status
For Billing Managers and Account Owners
- The user appears as disabled in the Users list
- Licenses may need to be reassigned
- Billing changes can be reviewed in the subscription summary
♻️ Re-Enabling a User
If needed, you can restore access:
- Go to Settings → Users
- Locate the disabled user
- Select Re-enable
- Reassign product licenses
- Apply changes
Access will be restored immediately once licenses are reassigned.
📬 What Happens Next?
For Users
- New users receive an email invitation to create their account
- Existing users gain access to newly assigned products immediately
- Users who lose product access are notified by email
For Account Owners and Billing Managers
- Monitor user activity from the User Management dashboard
- Adjust product access at any time
- Review billing-related updates in the subscription summary
- Reassign licenses as needed
💡 Best Practices
- Limit Account Owner access to essential administrators
- Periodically review user roles and product assignments
- Remove product licenses for users who no longer require access
- Ensure Billing Managers are trusted to manage subscriptions
- Disable users who permanently leave your organization
- Review product license allocation after disabling
- Be aware of subscription changes when removing the final seat
- Limit Account Owner access to essential administrators